Dramatic Clouds
by Nannette Dalton
Clouds are really interesting to me. There have been many times when I have taken a photo and was surprised to see how fascinating the clouds were. They really can give a dramatic feel to a photo.
I am going to show you how to boost those clouds just a bit and give them a little more contrast. This tutorial features one of the great tools that can only be found in Photoshop Elements, in the Enhance section of tools. So this time around, I will be providing a work around for Photoshop users.
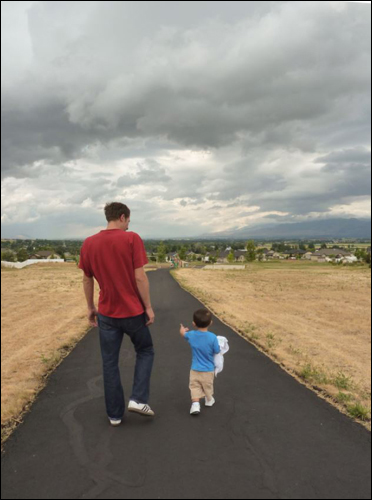
Here is a photo that surprised me when I looked at it. I was focused on my son and his son walking down the path, but the dramatic clouds pulled me into the photo.
Step One: Open and Duplicate the Photo
- Open a photo with some gray clouds (File < Open).
- In the Menu Bar, choose File > Duplicate and click OK. (Photoshop: Choose Image > Duplicate.)
- Close the original photo.
Step Two: Select the Clouds and Adjust the Levels
Photoshop Elements: (Adobe Photoshop instructions are below.)
- Get the Smart Brush tool.
- In the Tool Options, open the Preset Picker, open the drop-down menu, and choose Nature. Choose the Cloud Contrast preset.
- Set the Size to 200 px or whatever works best for your photo. (Earlier versions of PSE, open the Brush Picker and set the Diameter to 200 px.)
- On the document, click and drag over the clouds to select that part of the photo.
Note: If you selected more than you wanted, hold down the Alt key (Mac: Opt key) and carefully click and drag over any parts that you don’t want selected. Because this is a “smart” brush, the more you use it, the more it will learn what you want it to do.
- Press Ctrl D (Mac : Cmd D) to deselect.
If you like what you see, you’re done! If you think the clouds could use a bit more drama, continue with the following steps.
- In the Layers panel, double click on the Levels thumbnail of the Adjustment layer that you just created to open the Levels panel.
- In the Levels panel, click on the Shadow Input slider and drag it to the right until the contrast looks good to you.
Photoshop: (Instructions for Photoshop Elements are above.)
- Get the Quick Selection tool.
- In the Options Bar, click on the New Selection icon, uncheck Sample All Layers, and check Auto-Enhance. Open the Brush Picker. Set the size to 30 px, the Hardness to 100%, and the Spacing 25%.
- On the document, click and drag over the clouds to select that part of the photo.
Note: If you selected more than you wanted, hold down the Alt key (Mac: Opt key) and carefully click and drag over any parts that you don’t want selected.
- In the Menu Bar, choose Layer > New Adjustment Layer > Levels, and click OK.
- In the Properties panel or Adjustment panel, drag the Shadow Input slider to the right until the contrast looks good to you.
Step Three: Save the Photo
- In the Menu Bar, choose Layer > Flatten Image.
- Save the photo with a unique name (File > Save).
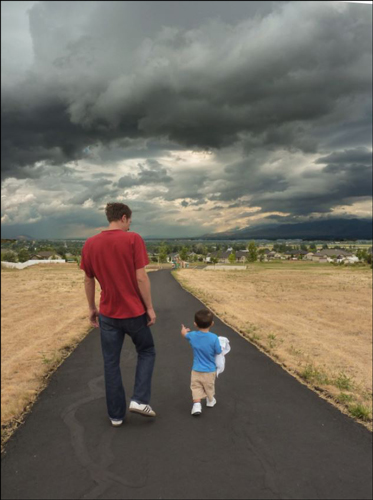
Here is my layout with my dramatic clouds. I love how it makes the photo look a little stormy, which works well with my title and pulls me right in.

Credits:
Digi Scrap Tutorial: Dramatic Clouds by Nannette Dalton
Software: Photoshop Elements 12, Adobe Photoshop CC 2014
Scrapbook page: Walk Beside Me by Nannette Dalton
Papers and embellishments: Outdoor Dad by Brandy Murry
Chevron from Chevron Wave Video Tutorial by Jen White
Fonts: Castellar Regular, Calibri Light Italic

_____________________________________________
 Author: Nannette Dalton | nann@digitalscrapper.com
All comments are moderated.
Please allow time for your comment to appear.
2 Responses
PatriciaD
Wow, this is really cool. Love the effect and the finished LO…totally awesome!! Thank you! I love clouds too so can’t wait to give it a go…and I always seem to have interesting clouds here in Alaska. (Unfortunately my laptop is at the doctor’s office – you know computer doctor…hehe.)
Nann Dalton
Oh, sorry to hear about the ailing laptop, no fun. Here’s hoping to a speedy recovery! Have fun with the tutorial.