
Grungy Border Element with the Gradient Tool
by Jenifer Juris
Dress up a simple background paper with a grungy border element custom made by you. The Magic Wand and Gradient tools make this technique simple and fun.
For this tutorial you’ll need:
- A patterned background paper
- Photoshop Elements or Adobe Photoshop
If you’d like to follow along exactly, download the paper I’m using here.
One tip before you get started is to be careful which patterned background paper you use. Not all patterns work well for this. Look for patterned background papers that have good contrast and crisp edges.
Step One: Prepare the Workspace
- Open a patterned background paper (File > Open).
- In the Menu Bar, choose File > Duplicate to create a copy. (PS: Choose Image > Duplicate).
- In the dialog box, click OK.
- Close the original paper file.

Step Two: Extract the Pattern
- In the Layers panel, click on the Padlock of the Background layer to unlock it.
- Get the Magic Wand tool.
- In the Tool Options, click on the New Selection icon and set the Tolerance to 32. Uncheck Sample All Layers and Contiguous, but check Anti-Alias. (Photoshop: Set the Sample Size to Point Sample.)
- On the document, click once on any part of the paper that is free of the pattern.
NOTE: A Tolerance of 32 should work if your paper has good contrast. If, however, you’re struggling to get a good selection, try a Tolerance of 20. If this still doesn’t work, you may need to try a different patterned background paper.
- Press Backspace (Mac: Delete) to remove everything but the pattern.
- Press Ctrl D (Mac: Cmd D) to deselect.
- Press the letter D to reset the Color Chips to the default of Black over White.
- Press Shift Alt Backspace (Mac: Shift Opt Delete) to fill the remaining pattern with the color black.

Step Three: Remove the Center
- Get the Gradient tool.
- In the Tool Options, open the Gradient Picker and choose Foreground to Transparent.
Note: If you do not see Foreground to Transparent, open the menu and choose Default. Then, open the flyout menu and choose Large List. (PS: Open the menu and choose Reset Gradients. Click OK. Then, open the flyout menu and choose Large List.)
- In the Tool Options, set the Mode to Normal and the Opacity to 100%. Check Transparency and Dither, but uncheck Reverse. Click on the Radial Gradient icon.
- In the Layers panel, click on the Add Layer Mask icon.
- Black should be the Foreground Color Chip. If it isn’t, press the letter X.
- On the document, click and drag from the center of the document outward to beyond the boundary of the document.
- Repeat this last step one to two more times.
NOTE: If you want to remove a little more of the pattern, extend the radial gradient even further beyond the edge of the document.
- Once what is left of the pattern is to your liking, in the Layers panel, Right click (Mac: Ctrl click) on the Layer Mask icon and choose Apply Layer Mask.

Step Four: Save the Document
- Save the document (File > Save As) as a PNG file with a unique name.
NOTE: Saving this as a PNG preserves the transparent background.
Step Five: Add to a Solid Paper
- Open a solid background paper (File > Open).
- Get the Move tool.
- On the grungy border element document, hold down the Shift key and click and drag the grungy border element onto the solid background paper.
Change the Color (Optional)
- Click on the Foreground Color Chip to open the Color Picker.
- In the Color Picker, sample the color you wish to use and click OK. I’m using white.
- In the Layers panel, make sure your grungy border element layer is the active layer.
- Press Shift Alt Backspace (Mac: Shift Opt Delete) to change the element to the foreground color.
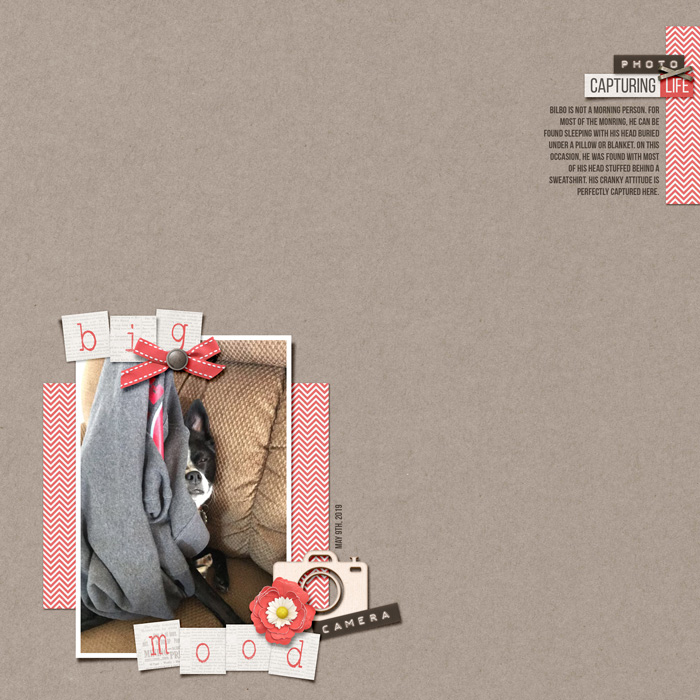
Here’s how I used this grungy border element (after I changed it to white) with a solid background paper:

More Examples:
Here are a few more examples for you to look at. I want you to see how versatile this technique can be.
Example 1:
Here is the paper I started with next to the grungy border element I made and used on a solid paper.

Example 2:
Here is the second paper I started with next to the grungy border element I made and used on a solid paper.

Example 3:
Here is the third paper I started with next to the grungy border element I created and placed on an artsy style paper.

Last, let me show you how I used my original paper in a scrapbook page. Here it is BEFORE I added the grungy border element:
And here is it AFTER:

It really does take the page from good to great. It looks more finished and has more visual interest without taking away from the main event – the photo.
Credits:
Page & Photo: Jenifer Juris
Kit: Memory Keeper by Kim B Designs
Fonts: Bebas Neue
Example 1 Papers from the kit Time Teller by Etc by Danyale
Example 2 Papers from the kit Carefree by Amanda Heimann
Example 3 Papers from the kit Christas Chic by Studio New Life Designs

Master the 7 most popular (and powerful)
selection tools in Photoshop or Photoshop Elements.
Save 15% on Selections 1 for Photoshop Elements
Save 15% on Selections 1 for Photoshop

_____________________________________________
 Author: Jenifer Juris | Contact Us
All comments are moderated.
Please allow time for your comment to appear.
35 Responses
Sameer patel
Hello Jenifer, Thank you for sharing this informative post about gradient tools. This is an interesting post. Good Job!
Kristin
Love This!!!
Roslia Santamaria
Thank you for sharing gradient tool information .
Nannette Dalton
Awesome tutorial Jenifer! You ROCK!
Jenifer Juris
Aw, thanks SO much Nann! You’re the BEST! 🙂
Lisa
Great technique! I love how it changes the look of the LO….
Jenifer Juris
Thanks! I love how it changes the look, too. 🙂 I’m so glad you like it!!
Joyce Walth
Thanks so much! How do you remember all those steps?! I think my brain will never remember them all! 😉
Jenifer Juris
That’s ok. That’s why we have a downloadable PDF so you can refer to it at any time. 🙂
Betsy
That was fun, Jen! It took me a couple of tries to get it right, but I did! I love your tutorials.
Jenifer Juris
I’m so glad you got it to work! 🙂
Donna J
I love this effect and am off to my “scrapping” computer to try this now! Thanks for the great lesson!
Jenifer Juris
Woot! I can’t wait to see how you use it! 🙂
Jobascraps
Thank you Jennifer, I really was inspired by your examples of other papers for this fun tutorial.
Jenifer Juris
I’m so glad you enjoyed the tutorial!! 🙂
Janine
I love getting your tutorials – you are a natural teacher and funny as well. Thank you so much.
Jenifer Juris
Thank you so much! 🙂
Jo Campbell
Wow! Thanks so much for this tut. Very useful.
Jenifer Juris
You’re so welcome! 🙂
Sharron
Classy! Can’t wait to try. Looks like it could become addictive! Thanks for all the examples. I don’t have much of an artistic imagination, so your examples helped a lot.
Jenifer Juris
I’m so glad you found the extra examples helpful. 🙂
Glori
GREAT tut, I for one love having some type of border…even if it’s just a bit darker on the edges. Love the “new” papers you created using a pattern…makes me wonder if there could be an action for this trick?!! :)))
Jenifer Juris
I’m so glad you enjoyed the tutorial. 🙂
Angela Hoynes
Distraction is my biggest problem! I started this tutorial, but got distracted with the effects and created something else instead, but I will get to it – promise x
Jenifer Juris
That’s just part of the creative process! Love that it inspired something else. 🙂
Margaret
Thank you!
Jenifer Juris
You’re welcome. 🙂
Christine
Another wonderful tutorial, Jenifer!! I’ve always wondered how this was done. Thank you.
Jenifer Juris
Thanks, I’m so glad you like the tutorial. 🙂
Angela Hoynes
I would normally do this with a very soft edged rubber, which can be a little hit and go back one step 🙂 This works on all patterns. Going to try doing it this way. With example 2 (the coloured words are now all blue). Did you overlay the colour blue and then Ctrl + G ?
Jenifer Juris
Actually, the words were changed to white (once I removed the non-pattern part of the paper) and placed over a blue solid paper. I hope that helps. 🙂
Jessica Trotter
Great way to jazz up my papers! Thanks, Jenifer!
Jenifer Juris
You’re welcome. 🙂
Julie Singco
This is a great tutorial, Jenifer! I’m always looking for ways to subtly add interest to the background papers in my layouts. Thank you so much for the inspiration.
Jenifer Juris
I’m SO glad you like the tutorial! 🙂